You can access the services and tools provided by Astrogrid from several scripting/programming
languages. In this document we describe how this is done from Python. Python is a high level
programming language which is becoming very popular in astronomy.
Requirements
Python
In order to access the Astrogrid services from Python you need a recent version of
Python installed. Python versions 2.4 (released on November 30, 2004) and greater
come with all needed libraries but the latest version of Python is recommended
(2.5 released on September 19th, 2006). In order to know which python version you are
running you can type from the command line:
python -V
If you do not have a version greater or equal to 2.4 then you will need to install a more
recent Python. Find below some instructions on installing Python in different systems.
More details are available in the
Beginners Guide Downloads Section http://wiki.python.org/moin/BeginnersGuide/Download.
If you are running Windows just go to the Python download page
(http://www.python.org/download/) and choose Python 2.5 Windows Installer.
By default Python will be installed in the directory C:\Python25.
If you use Linux then Python is included in all main distributions by default. Refer to
your package install instructions to install it if it is not already in your system.
Generally something like apt-get install python or yum install python will be enough.
Mac OS X (10.4) comes with Python 2.3 installed, but you will need to use Python 2.4 or later.
There are several ways of getting it:
OS X 10.5 already comes with Python 2.5 installed so you do not need to do anything else additional.
Astrogrid VO Desktop
The VO Desktop provides an interface called 'Astro Runtime' or AR (sometimes referred to as Astro Client Runtime or ACR as well) which bridges the local computer with the VO services. In order to access the VO from your python script you need to have VO Desktop running. Download it from http://www.astrogrid.org
Installation and Configuration
Quick installation
For a quick installation which does not involve any third party packages follow the instructions below. Note however that if you plan to use Python seriously you should consider installing packages like numpy and scipy (for numerical processing), pyfits/pcfitsio (to read fits files), matplotlib (to create plots) and others and then the setuptools route discussed below is more appropriate. Also updates are handled easier. Anyway to quickly start with Python and Astrogrid:
- Download the latest egg file from http://pypi.python.org/pypi/astrogrid and save it somewhere in your disk (e.g. $HOME/astrogrid-1.0.1-py2.5.egg)
- Set the PYTHONPATH enviromental variable to include the downloaded file (e.g. export PYTHONPATH=$HOME/astrogrid-1.0.1-py2.5.egg). Windows users see notes under Installation Using Setuptools.
Then go to the configuration section directly.
If you do not have setuptools already installed then download the latest ez_setup.py http://peak.telecommunity.com/dist/ez_setup.py
and run it (double click on Windows); this will download and install the appropriate setuptools egg for your Python version.
Then (for linux, MAC OS X or Windows DOS command line) you just need to type::
easy_install astrogrid
or if you already have a previous version of the module installed
easy_install -U astrogrid
(note: check that you do not have a subdirectory called astrogrid in the directory you are running this command from, otherwise it will try to read the installation files from that directory and fail).
For more information using easy_install look at the
documentation http://peak.telecommunity.com/DevCenter/EasyInstall and
in custom locations http://peak.telecommunity.com/DevCenter/EasyInstall#custom-installation-locations if
you do not have administrator access to the Python installation directory.
For Windows, after running "ez_setup.py" via double click you need
to add python & scripts folder to your PATH variable, e.g. in Vista:
Start - (right click) Computer - Properties - Advanced System Settings - Environment Variables
Then in System Variables window, scroll down to PATH and add
";C:\Python25\Scripts;C:\Python25"
This method is also described at http://cybertechhelp.com/forums/blog.php?b=4
Configuration
This module expects a configuration file located $HOME/.python-acr (or $HOME/_python-acr for Windows
Users). In order to create one just import the astrogrid module from python, it will automatically
detect that you do not have one and will create a skeleton one for you::
python -c 'import astrogrid'
This default configuration file looks like::
  debug = False
				  verbose = True
				  autologin = True
				  plastic = False
				  timeout = None

				  [community]
				  default=leicester

				  [[leicester]]
				  username = username
				  password = password
				  community = uk.ac.le.star
where username and password are your particular credentials for logging into your
AstroGrid accounts. With this configuration you will not be asked about your login credentials since these will be read
from the configuration file when needed (autologin=True).
Make sure that the configuration file has right properties, i.e. it is only readable for the owner.
In Unix you do chmod 0600 ~/.python-acr.
In Windows, edit user, pass as above for AstroGrid and UKIDSS from DOS using, e.g.
edit _python-acr
Encrypting the configuration file
This step is optional. For an extra layer of security you have the option to encrypt your configuration file. Of course
this means that you will be prompted for the password used to encrypt it whenever you import the astrogrid modules from python or run a script. To do this, inside python:
from astrogrid.config import cryptconf
				cryptconf()
and type a password. The same command will decrypt a previously encrypted file.
Getting Started
In order to use AR from Python you need the AstroGrid VO Desktop running. Then you need to type the following:
$ python
				>>> from astrogrid import acr
and in Windows from the DOS command line:
> python
				>> from astrogrid import acr
Log In and Out
Once you have a configuration file as described above you can login
into your different accounts using::
# Login in the default account
				acr.login()

				# Login in your ukidss account
				acr.login('ukidss')

				# Login user particular credentials
				acr.login(username, password, community)
To log out simply type::
Getting help
Suppose that we want to perform a conesearch, so we first import the ConeSearch class::
from astrogrid import ConeSearch
You can get help about the usage of the class and its methods by typing::
Query the Registry
The registry holds the information about all services available within the VO. Below some examples
on querying the registry for resources.
from astrogrid import Registry
				reg = Registry()

				# search for Cone services related to SDSS
				# and print their ids
				list = reg.searchCone('SDSS')
				print [p['id'] for p in list]

				# Print the description of service number 5 of the list
				print list[5]['content']['description']
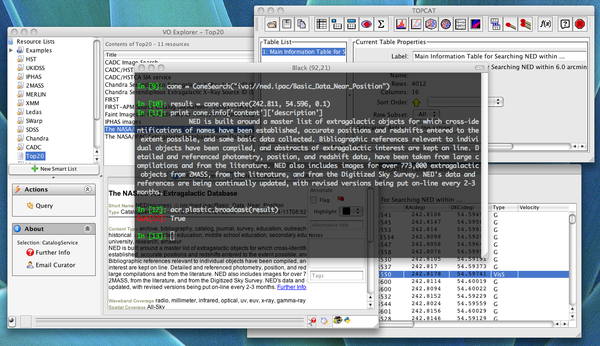
A cone search returns all objects in a catalogue around a position in the sky. The following example queries the NED database:
from astrogrid import ConeSearch
				cone = ConeSearch("ivo://ned.ipac/Basic_Data_Near_Position")
				result = cone.execute(242.811, 54.596, 0.1, saveAs='#cones/ned.vot')
Note that in this case the data is saved to your VOSpace meaning that no data is transferred from the service to your computer but from the service and the computer hosting VOSpace.
This are the basic lines to perform a SIAP search. For a more complete example
and link to a full working script look below in the examples section::
from astrogrid import SiapSearch
				siap = SiapSearch('ivo://nasa.heasarc/skyview/sdss')
				result = siap.execute(180.0, 2.0, 1.0)
Run an application
Apart for finding and retrieving data you can also run applications that consume that data. For example if you have an image and want to extract the objects from it then you can run SExtractor:
from astrogrid import Applications
				app = Applications('ivo://org.astrogrid/SExtractor')

				app.inputs() # Contains the input parameters
				app.outputs() # Contains the output parameters

				app.inputs['ANALYSIS_THRESH']['value']=1.5
				app.inputs['IMAGE_BAND']['value']='R'
				app.inputs['MAG_ZEROPOINT']['value']=25.0
				app.inputs['SEEING_FWHM']['value']=1.2

				app.inputs['PARAMETERS_NAME']['value']=params
				app.inputs['FILTER_NAME']['value']=filter
				app.inputs['config_file']['value']=config

				app.inputs['DetectionImage']['value'] = '#sextractor/image.fits'
				app.inputs['PhotoImage']['value'] = '#sextractor/image.fits'

				app.outputs['CATALOG_NAME']['value'] = '#sextractor/image_cat.fits'

				# When the inputs and outputs are filled in
				# the application is submitted as
				task=app.submit()

				# To check the satus of the running application use:
				task.status()

				# If 'COMPLETED' then your job has successfully finished.
A complete python example is available below.
Query a catalogue using ADQL
In order to query a service which provides ADQL capabilities we use the Data Set Access
class (DSA). The following example illustrates the basic commands to query the 2MASS PSC
catalogue:
from astrogrid import DSA
				db = DSA('ivo://wfau.roe.ac.uk/twomass-dsa/wsa/ceaApplication')
				app = db.query('SELECT TOP 10 * FROM twomass_psc AS x')

				app.status()

				result = app.results()[0]
Work with VOSpace
This is how you list the contents of your root directory of VOSpace:
from astrogrid import MySpace
				m = MySpace()
				m.ls()
You can delete files or folders:
m.rm('#test/file.vot')
				m.rm('#test/', recursive=True)
and read file from VOSpace::
img = m.readfile('#sdss/image.fits')
File names in VOSpace always start with the hash key (#) or with 'ivo://'. For instance
when broadcasting a file to plastic listening applications::
# A file in local disk
				broadcast('image.fits')

				# A file in VOSpace
				broadcast('#image.fits')
Send results to TOPCAT or Aladin
If TOPCAT or Aladin (or any other Plastic listening application) are running t
hen you can send the results from your queries or tasks directly to them. This is how:

# Start plastic connection
				acr.startplastic()

				# Send a local file to Aladin
				acr.plastic.broadcast('image.fits', 'Aladin')

				# Send a file in VOSpace to all applications
				acr.plastic.broadcast('#sdss/catalogue.vot')

				# Send the result from a cone search to Topcat
				result = cone.execute(250.0, 54.0, 0.3)
				acr.plastic.broadcast(result, 'Topcat')
Run processes in the background
Using IPython it is possible to run any process in the background. E.g.::
cone = ConeSearch("ivo://ned.ipac/Basic_Data_Near_Position")
				%bg cone.execute(180.0, 1.0, 0.1)
				%bg cone.execute(180.0, 2.0, 0.1)
				%bg cone.execute(180.0, 3.0, 1)

				jobs.status()
				Running jobs:
				2 : cone.execute(180.0, 3.0, 1)

				Completed jobs:
				0 : cone.execute(180.0, 1.0, 0.1)
				1 : cone.execute(180.0, 2.0, 0.1)

				jobs[1].status()
				'Completed'

				votable = jobs[1].result
Submitting feedback
Your feedback is welcome. To submit your comments from within python you just need to type::
from astrogrid import feedback
				feedback.submit()
An editor will appear (it depends on your EDITOR environment variable or uses vi or notepad as defaults) in which you can write your feedback. Close the editor to finish the submission. Please use this only for comments on the Python wrapper to the ACR not for general astrogrid comments.
API Documentation
The documentation of all modules and routines is available as PDF in here
api.pdf
Complete Examples
The following links provide complete scripts which perform the described action. You can copy paste form the pages or download all the scripts from the tar file linked at the bottom.
These and other Python scripts are available as a tar file: python.tar.gz.
